
SM3DVM Home | Completed Projects | Work in Progress | Ideas and Reference | Contact Me
This is my most ambitious project to date - Whitecliffe St. Level Crossing. It's a scenery item intended for my projected "Saxham Market" virtual layout, a representation of a fictitious East Suffolk railway station in the late 1950s. For inspiration I'm borrowing heavily from real locations, but modelling an imaginary station so that I can employ my modellers' licence to the
The prototype for this level crossing is the Albion Street level crossing in the Suffolk town of Saxmundham. Albion St. crossed the former East Suffolk railway with a level crossing in the middle of Saxmundham station. The passenger platforms were staggered, with the "up" platform lying to the north of Albion St and the "down" platform to the south. The level crossing was also in the middle of a trailing crossover between the up line and the down line, and to make life even more complicated the connecting line was extended into the goods yard. The junction between the connecting line and the down line was a double slip, so that trains could enter the goods yard to either running line, and also leave to either running line.
I'm working from photographs and maps, dating from the period from 1920-1965 or thereabouts. After that period, the trackwork was greatly reduced, the goods yard was removed and a new down platform was built on its former site. As a result, the whole of the station now lies to the north of Albion St. The rail network itself has also undergone considerable reduction: the lines to Yarmouth and via Bungay to connect with the Norwich-Ipswich line were abandoned about 40 years ago, leaving only the Ipswich to Lowestoft route intact. Much of that route was itself reduced to a single RETB (Radio Electronic Tokenless Block) signalled track in the 1980s, and most of the stations (notably Beccles) are now mere shadows of their former selves.

It's not absolutely clear, from the maps and photographs I've seen, whether the double slip I've described really was a double slip, or merely a single slip. However, a double slip would be consistent with what I can see of the track in other locations. This is where my modellers' licence comes in handy, since I'm modelling a fictitious level crossing at a fictitious railway station.
Whatever the exact arrangements, the quantity of track on the level crossing is impressive, and conditions must have been difficult for traffic when the rails were wet or icy. Remember, as well, that this crossing was originally laid when horse traffic was still common.
Another use of modellers' licence comes about because none of the photographs of Saxmundham station that I've seen show the Albion St crossing gates. However, I do have some photographs that show the level crossing gates at Brampton station, a few miles up the line, so I've simply "borrowed" those gates and moved them to "Whitecliffe St." The gates at Aldeby, a few more miles up the line, look very similar, so I'm assuming that this is a typical design for the East Suffolk line of 50 years ago. If it isn't, I'm modelling a fictitious line anyway!
This is, as I said, an ambitious project. It might well be too ambitious, but I hope not.
24th March 2008
I won't be making any more entries on this page.
Because the project is finished! .
Perhaps I should have put "completed" because, as all modellers know, even though a project might be complete, it's never really finished!
Still, whatever word I choose, the fact remains that the Whitecliffe St Level Crossing Project has finally reached its desired end. Over time it might be, and over budget (where the budget was for cups of coffee and loss of hair through frustration), but everything has now been packaged up and sent to the Download Station for approval. So, all being well, it should be ready for download some time around 28th March 2008. At which point I'll make an entry in the " "completed projects" section of the SM3DVM Home Page, and the entries on this page will cease.
Probably.
Because, having done this work, I'm well placed to expand the range to include such variations as 45° and right-angled level crossings, crossings with four gates, single track crossings, and so on. But not just yet, because I need a short rest!
Features of the completed crossing include:
29th January 2008
More invisible progress.
Not all invisible, as the level crossing gates now sport lamps that light up. Unfortunately, there doesn't seem to be a way for the "coronas" (the representation of the "shine" of the lamps) to move when the gates move. I've come up with a solution by using script to turn the lights off when the gates start to move, and then back on in a different location once tje gates have reached their new position. Seeing the lights turn off and then back on is a little strange, but it seems to work well enough.
Ah yes, scripting. A sure cure for sanity! The thing that held me up most was that I hadn't appreciated was that:
string x = y;What I should have written was:
string x;
x = y;
19th January 2008
Progress at last!
No problems with the modelling as such, but since the last update at the end of November,
this is only my third weekend at home (and one of those weekends was the lead-up to
a Christmas when I was doing the entertaining, so I couldn't really slope off in the
middle to play with work on the computer).
Anyway... on returning to GMax modelling, the first thing I did was to have another look at the photographs I'm working from, and it soon became clear that the arrangements for supporting the end of the gate farthest from the main post were a little more complex than my first interpretation. Rather than being anchored about half way along the top of the gate (and I always did think that particular arrangement wasn't really up to the job), the tie bar (or is it a cable?) is anchored to some sort of jointing component just above the gate. Two supports then run on to be anchored to the bottom of the gate much closer to the far end than in the original arrangement, which makes far more sense from the point of view of the physics of the situation.
One gate corrected so far, but that gives me the opportunity to show the difference between the old and the new arrangements (see below). It might not look like that much work, but it does make my model look more like the original photograph.

22nd November 2007
The animation and scripting still seem to be behaving themselves,
so it's time to return to the outstanding scenic work. Remaining issues include:
20th November 2007
Another three weeks gone and no visible progress, but
I have now sorted out the animation and scripting, to stop impatient motorists from driving
through the gates before they're properly opened. My first attempt met with limited (or, to
be correct, variable) success, since the scripting correctly stopped the road traffic
whenever the gates started to open. It also waited until the gates were completely open
until starting the traffic... two times out of three. Unfortunately, on that third occasion,
the overall effect looked most unusual.
Fortunately, I haven't had to resort to Plan B (an alternative animation in which the gates shatter into pieces as the cars drive through). I don't claim my solution is especially clever, as it simply involves the crossing sending additional "stay still" messages to the traffic as the gates start to open. That seems to do the trick... until the next unforseen problem rears its head, that is.
29th October 2007
Over the last couple of weeks or so I've made very little
progress that's visible in static pictures. However, I've made major inroads into the
animation and scripting so that the gates close (from the point of view of a road user)
as a train approaches, and open once it's past. Since there's only one gate on each side,
they have to open and close sequentially, which causes a problem in that Trainz models some
very impatient drivers, who drive through the gates the moment they start to
open. To solve that problem, I'm including scripting that will communicate with a dummy
level crossing that controls the traffic, and will incorporate a delay between the gates
starting to open and the traffic restarting.
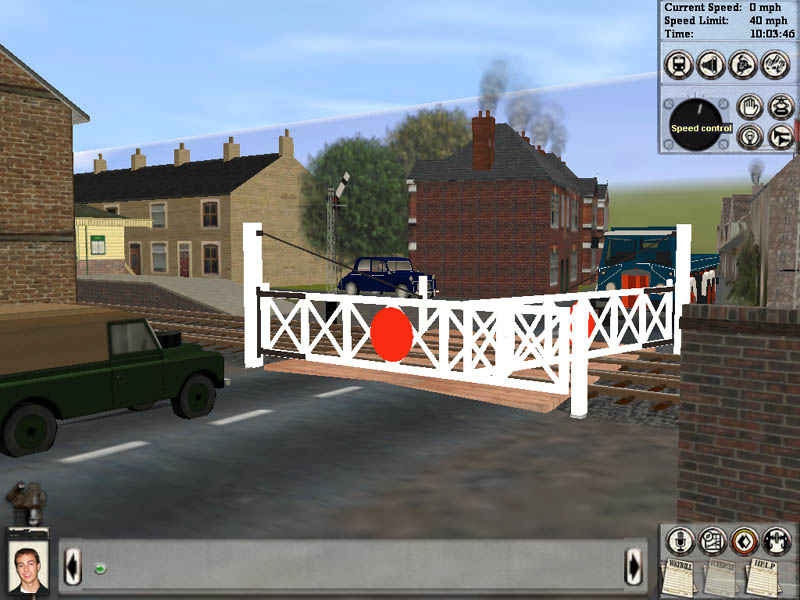
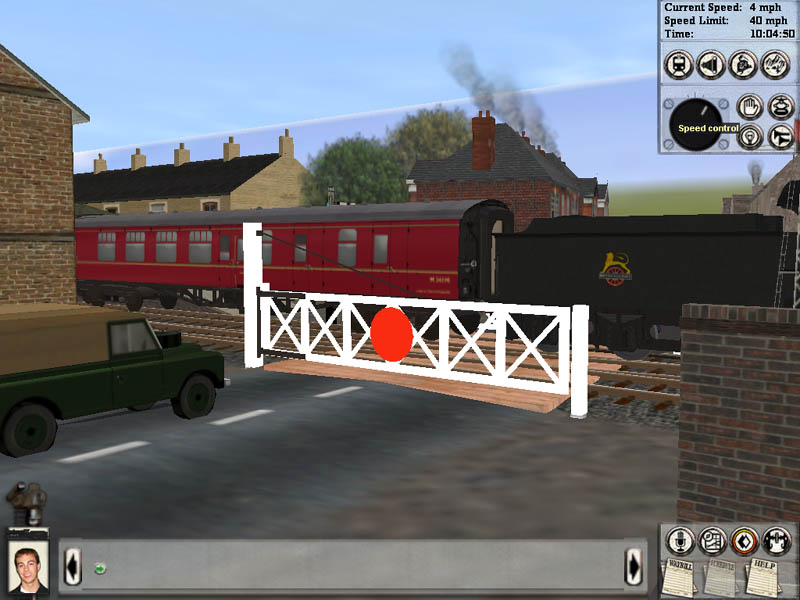
Meanwhile, here are some snapshots of the gate animation as a train approaches and passes:


16th October 2007
Excess polys have now been culled, I've tidied up
the hinges, and corrected an error in that I'd hung the gate on the wrong side
compared with the photograph I'm working from. Perhaps most important of all,
I've added the second gate. The next task is to animate it properly.

13th October 2007
I've now made the first gate,
and successfully tested its animation. With that job out of the way, I went
back to the gate to add some more details and embellishments. Once I'm happy
with the look of the first gate, it will be time to cull the unseen polys,
and then clone the first gate to make the second. Here's how it looks now:

12th October 2007
I've placed the attachment points for the track
and the roads, and sorted out a couple of issues with track alignment. Here's
how it looks so far, complete with loads of metal in the middle of the road.

The grey lines running down the centre of the main lines are part of a temporary structure I built to help with track alignment, and I'll delete them when I've finished adding the other parts such as gates and crossing boards. The red pillars are there to assist with placing the track outside the boundaries of the crossing itself. They're only visible in surveyor, and I'll be leaving them in place in the final release.
This page was last updated 05 November 2009